
As part of my quest to help the environment, the LSP1 editor has been written and released into the wild. Due to running everything without funding or asking for funds (though gifts are really apprecaiated), I cannot offer help and support. When people do post bugs in the comments, I do update and fix. Anyhow, I digress – to compensate, I aim to document in detail my projects through videos and support pages. This page is all about a user guide explaing how the LSP1 works.
Starting from the top menu, click on MIDI and assign your input and output channel. Match this to your Reflex or click the LEARN button and move controls on the LXP-1. Make sure you have midi out enabled. On the LXP-1, this involves changing a jumper on the inside or using the THRU to pass data into another device (such as the LXP-5) with an OUT. If you’re not sure how to complete this, I recorded a video which I will embed at the bottom of the page.
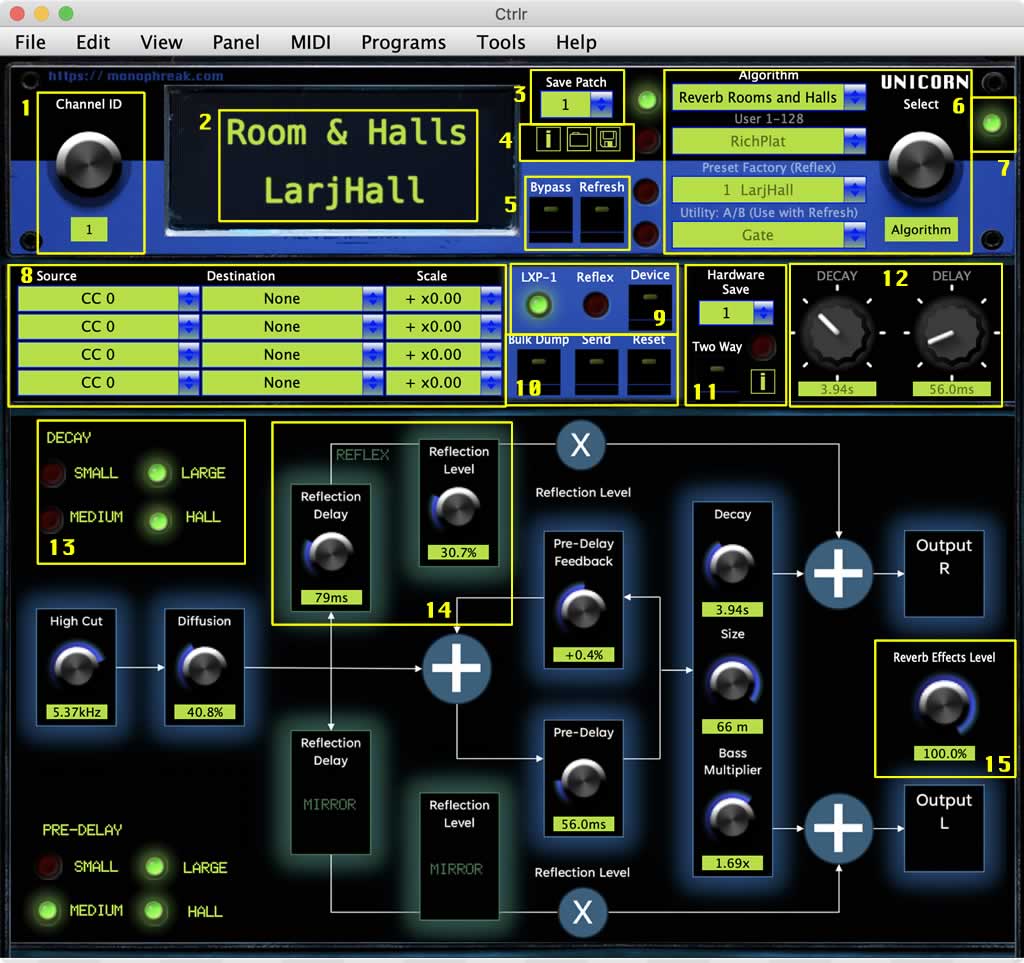
- 1 Channel ID – Turn this dial to the channel you wish to use.
- 2 LCD – Contains a readout of the active algorithm and preset. You can click into the preset name and type in a new one.
- 3 Save Patch – This is the main preset saving system. After making edits, click on this combo box and choose a location from the 128 space memory where you want the preset to be stored.
- 4 Info and load from file. A built in user guide and SysEX loading option. You can use a tool such as SysEX Librarion, download a patch and then save. The LSP will read this file (and any other single preset) and load in. This makes sharing presets quick and easy.
- 5 Bypass and Refresh. Bypass lets normal, unprocessed audio pass through the Lexicon (currently tested for Reflex) and Refresh loads changes make on the hardware which may have been completed from the main hardware dials or a hardware controller. Clicking refresh ports these in. You can you ‘Two Way’ to make live edits instead.
- 6 Preset system menu. Enables you to scroll through algorithm selection, presets stored on the device, original Reflex and LXP-1 presets or the A/B utility. The A/B utility enables you to load a patch without interfering with the current settings. This is useful for comparing changes and works with the Refresh button to load back in the current settings on the box. To load a factory preset or algorithm – click SEND after selecting from the menu.
- 7 Bypass light. If bypassed, the light is active.
- 8 Source, destination and scaling. This can be used to select various midi controls and scales. Loading is a bit sporadic are the moment due to the need for a sleep script to slow down the SysEx reading. Setting is straight forward. Refresh can reload it in again if the paramters skip.
- 9 Device Selection. Reflex or LXP-1. The devices have slight differences which will be set based upon this switch.
- 10 Dump, Send, Reset. Bulk dump enablesd you to send all of your presets to a program such as SysEx Librarian for recall later. It also loads in the patch names from your LXP-1/Reflex into the combo box for the user presets. Send will re-send the settings from the panel into the hardware and useful for quick DAW setup. Reset will reset the panel to blank.
- 11 Hardware section. Hardware save if you have made changes on the hardware itself or via a piece of control hardware and need to write. Two Way to enable hardware changes to be reflected in the editor and an [i] information page containing a guide.
- 12 Representations of the front dial changes. Making changes in the editor will show you the closest approximation in the LXP-1 hardware.
- 13 Algorithm features. Some algorithms contain LEDs to highlight features specific to the algorithm. In this case, how the dials relate to the different reverb types.
- 14 Hardware specific controls that have been written to save presets across both systems.
- 15 Dials. Turning these dials will enable you to live edit (and automate in DAW versions with latch/write modes) your presets.