
As part of my preparation for the new Mac Mini, I have been investigating how to preserve sounds from effects plugins which will no longer work on the Silicon Macs. As a result, I have learned how to use the Impulse Response Utility in Logic to carry over some of my favourite effects.
In this example, I look at porting over one of my favourite Drum Room Reverb presets from the M30. I came across this plugin through the Groove3 video by Tim Allen where Tim takes us through a fantastic remix of Fine Day. The M30 is used as a drum room reverb effect. I like the sound of this plugin and it is something I wanted to keep and therefore, I decided to build a stereo impulse response. I have previously been running the M30 through Sound Radix’s 32bit Lives. Technically, it should have stopped working a long time ago already so it is great to keep the magic alive. With my Mojave laptop on the way out, there is no way in which I can run this amazing application again being as I seem to recall that this would not work on Catalina so this is my last chance.
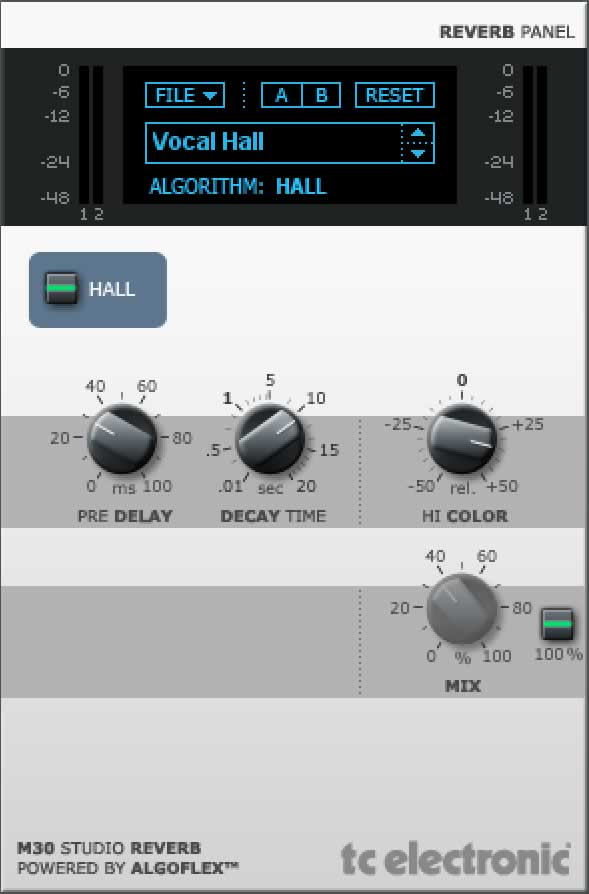
An image of the M30 Reverb (not the actual bus preset from on Groove3)
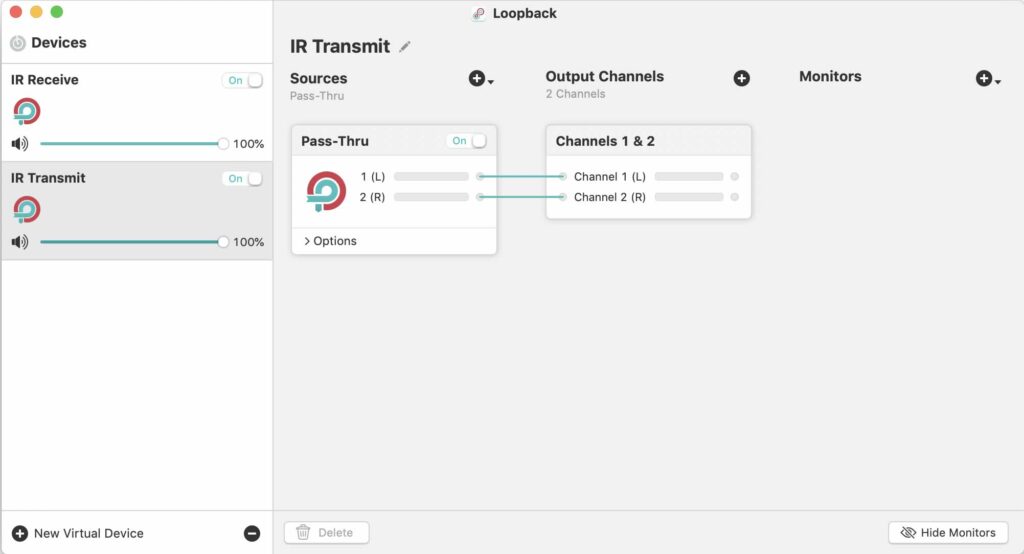
The key to making this work is to loop audio through the input utility and Logic. I initially used SoundFlower and Blackhole but moved onto the amazing Loopback plugin by Rogue Amoeba. I decided to purchase this utility because I thought it would be useful for running more experiments for my Osia hearing implant and I have a plan for an upcoming experiment. As I now have it, I thought it may as well use it to replace my Soundflower and Blackhole routing. I used the 16 channel Blackhole and Audio Midi Setup tool before but it was quite complicated.
To start the process, in the Loopback application, create an IR Receive and IR Transmit virtual device by clicking on the botton left (+) icon and entering a sensible name. It should look similar to this.
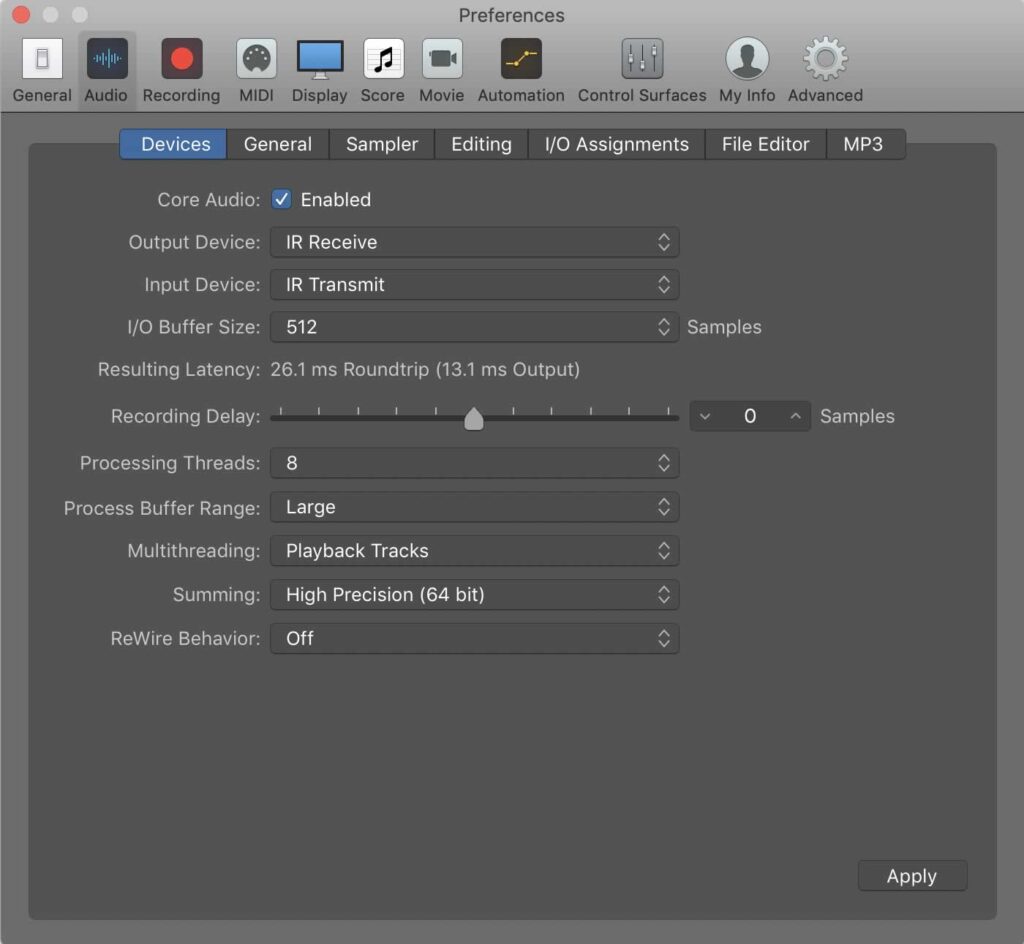
In Logic, set your audio drive input and output to match up with the receive and transmit option.
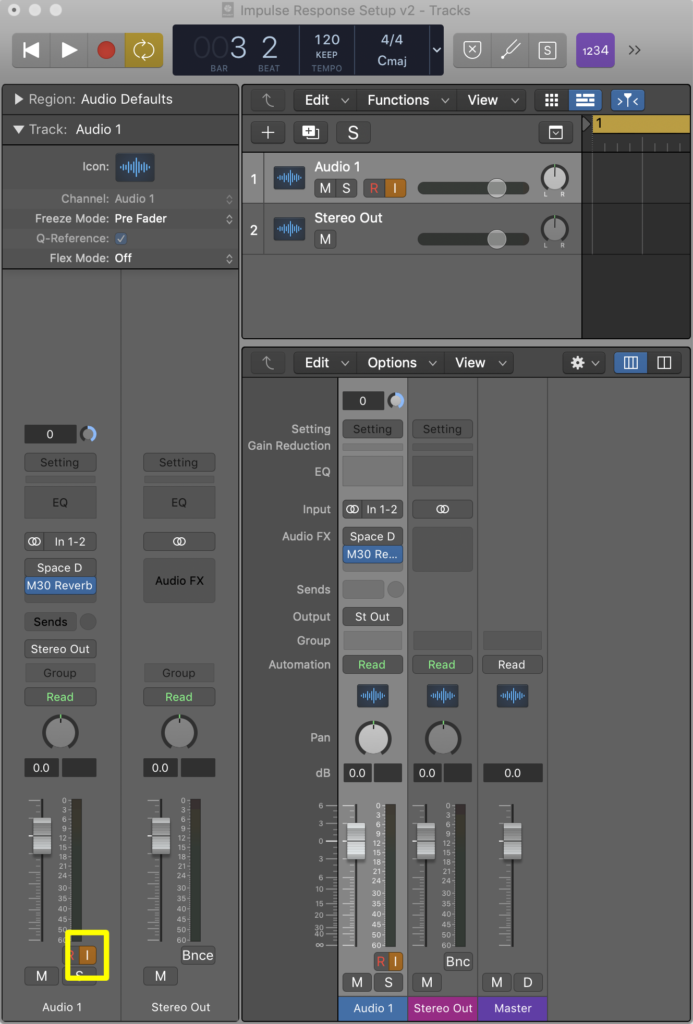
Load your effect onto an audio insert and select the [I] to active. the [I] should turn organge if successful. Click on the channel strip to make sure the channel is active. This is represented by a lighter grey colour.
Load up Space Designer and load the impulse utility. It can be found under the combo box towards the top centre of Space Designer. Click towards the right hand up/down icon and then select Impulse Response Utility. After it loaded up, I pinned the utility to the dock for quick access and convenience.

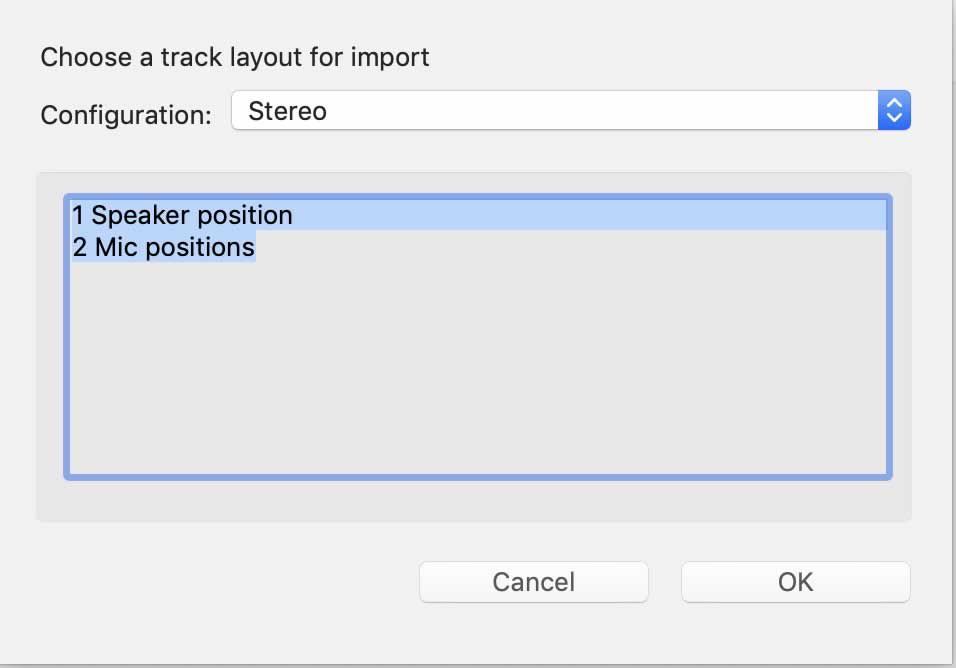
Select the mono or stereo option from the first load and add your receive and transmit routing to the top of the Impulse Response Utility.

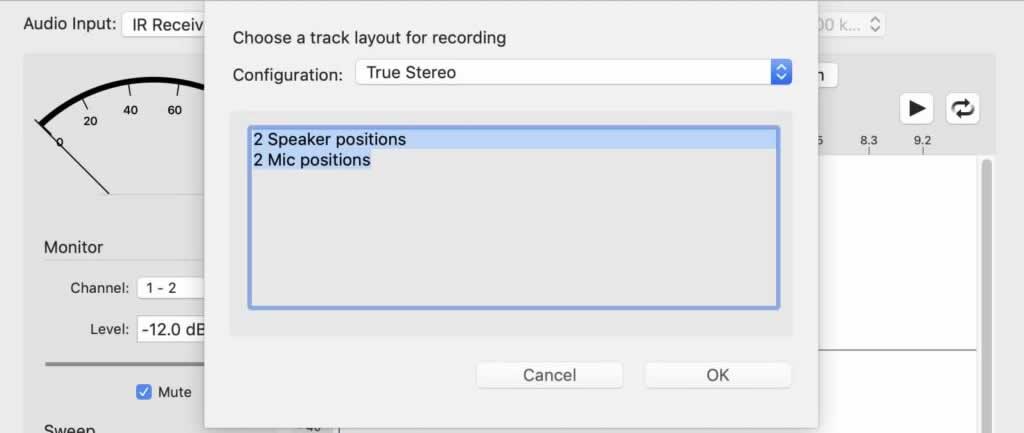
Now open a new IR from the top menu under File –> New and then select True stereo for the configuration.
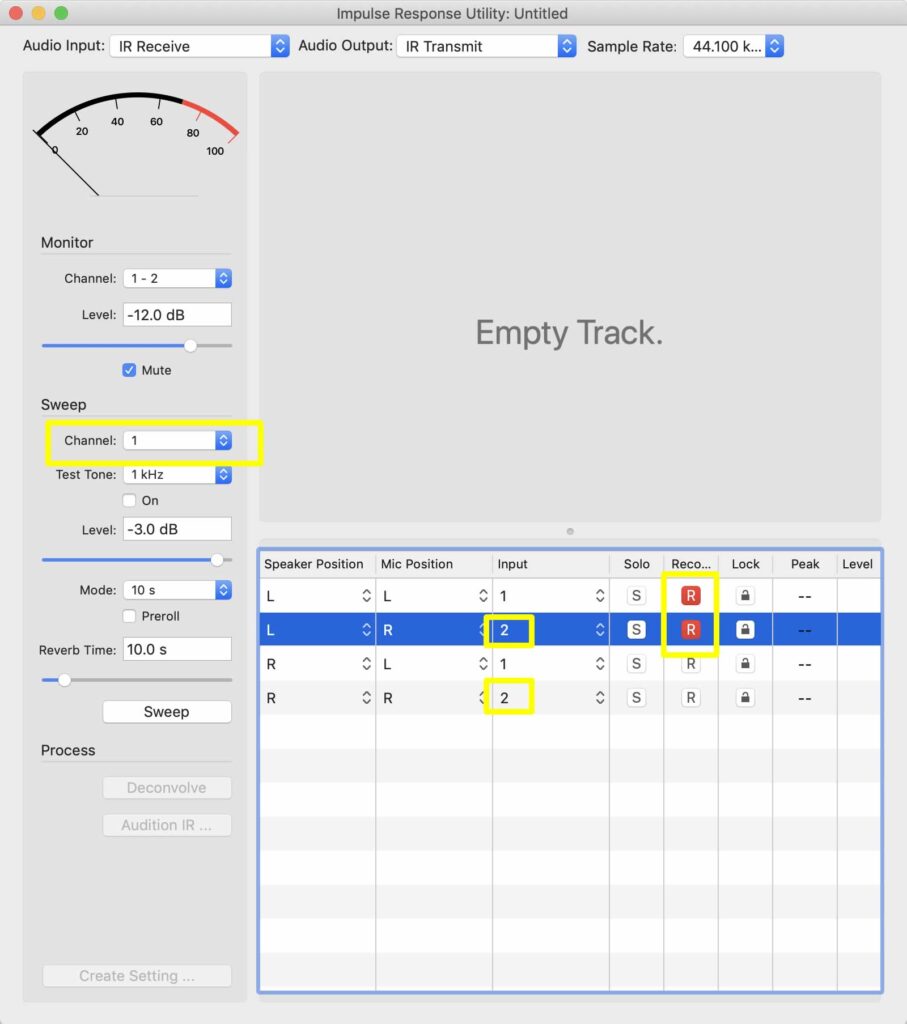
Change the last channel numbers on the Input for L and R to channel 2.
Make sure that channel 1 is selected under sweep. Arm the impulse utility by clicking on the two record buttons for the left channel. Look at your reverb decay time, double it and add the setting to the reverb time on the bottom left.
Click sweep and wait until the record buttons changes to lock. The empty track space will fill up with a wave form during the sweep process.
While sweeping, make sure that the peak meters in Logic and Impulse Response Utility do not go into the red and cause distortion. If they do, lower the decibel threshold level, click the padlocks and delete the recordings when prompted. Re-arm the record and click the sweep button again.
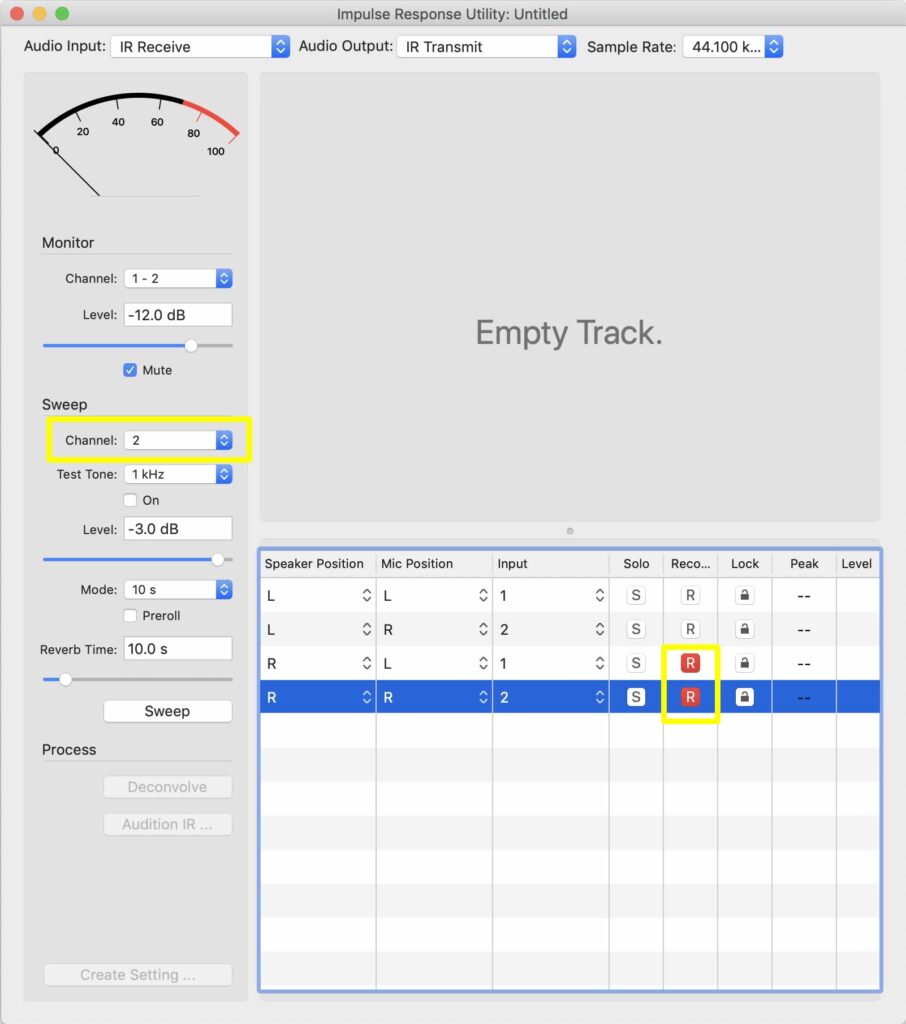
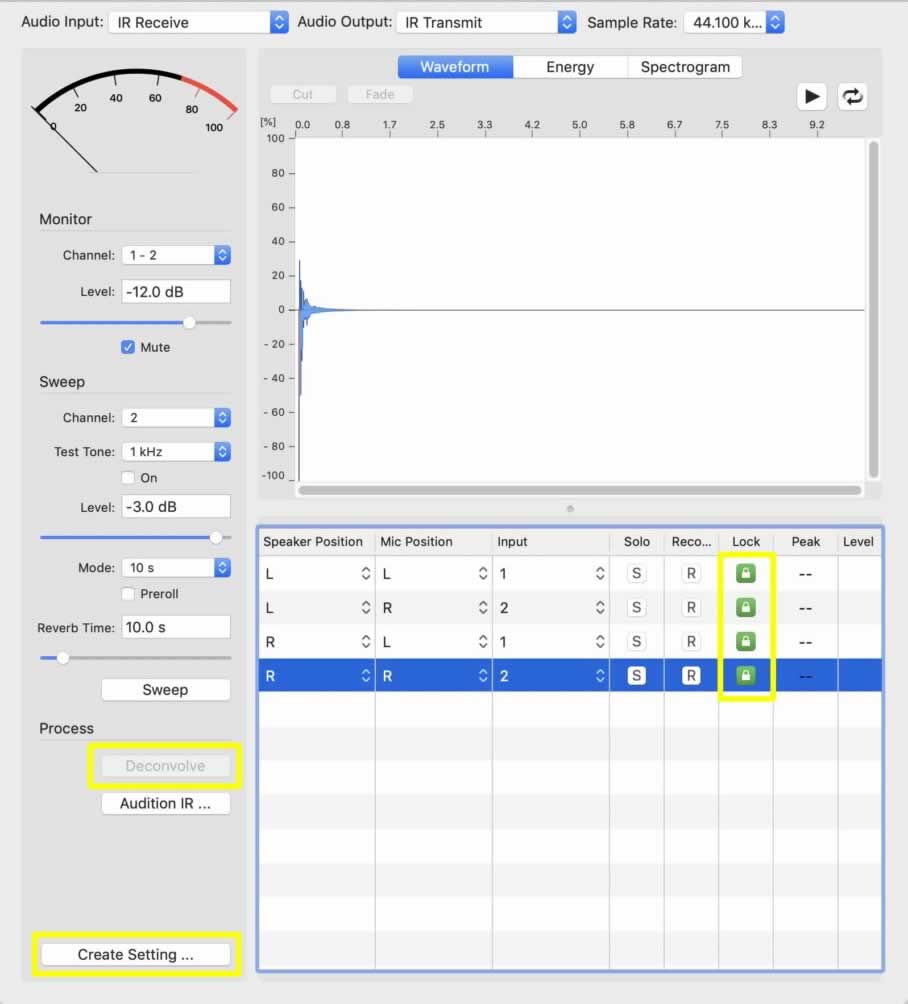
After the padlocks have turned green, change the channel to 2 and arm the two right channel items. I currently have the green padlocks missing in the image below but if the process has successfully completed, the top two will turn green. Repeat the process, being mindful of the peak meters. If you need to adjust the peak meters here, then restart the whole process so that you have an even recording of the impulse response.
After the second set of padlock have turned green, click the ‘Deconvolve’ button to generate the impulse response. Save your file. Click on the create setting button and this will add the SDIR file and preset to Logic. You now have your favourite M30 plugin setting available in Space Designer.
Due to the power of Space Designer, I prefer to remove the pre-delay from within the plugin and add this in myself from inside Space Designer. As a result, I took a second reading without pre-delay and then adjusted this myself within Space Designer. Having two is handy because I can compare them both and adjust accordingly.
My first attempts at routing failed badly. I looped both the recieve and transmit virtual devices incorrectly via SoundFlower and incorrectly inside Logic which led to a cycle of feedback. I had to drop the input dB value considerably and set everything to a much longer record time. This led to really interesting set of feedback based reverb impulse response effects which I am certain to use in another track.
Another interesting area I noticed was that the M30 (with the colour dial) added noise into the reverb sound. The peak meter always exhibited sound. I think it is this type of thing which adds interest to this reverb.
Autosampler
Another technique thatI’ll cover in a future blog post is to use Autosampler to build software Sampler instruments for out-of-date synth VSTs/AUs so that you can continue to use your favourite patches.